The program to generate and display weather forecast maps from the NCEP data
- System requirements:
- Microsoft Windows-7 (x64) or later
- DirectX Visual C++ Redistributable for Visual Studio 2015 (x64)
Quick start guide
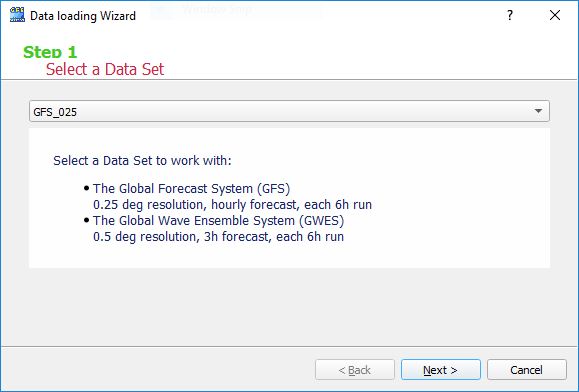
For the first time, please follow Grib Data Download Wizard
- Please, provide your email in the Sign In dialog or just cancel it to sign in later
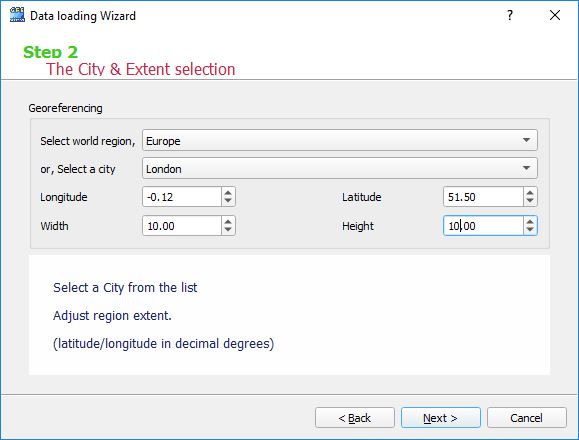
- Select a City from the Countries/Places list to point the center of your region.
- Adjust a region extent (latitude/longitude rectangle in decimal degrees) around the center selected.
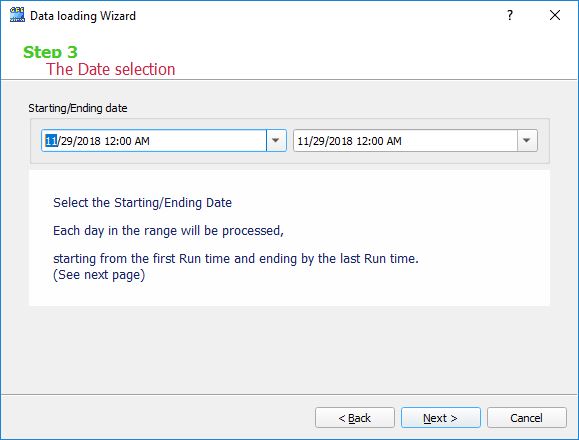
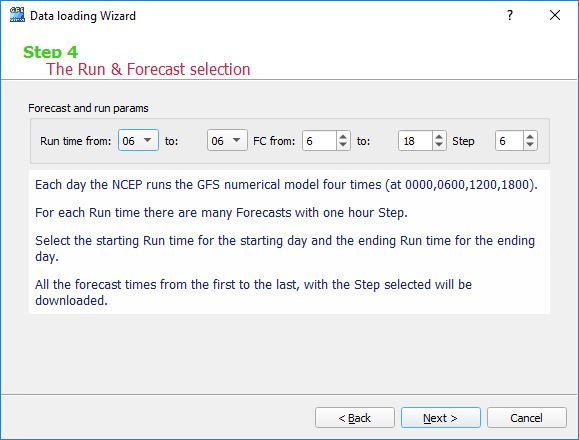
- Select the Starting/Ending Date. Each day in the range will be processed, starting from the first Run time and ending by the last Run time. All the run times between that period (with the 6 hours step) will be processed.
- Each day the NCEP runs the GFS (WAVEWATCH or NGAC) numerical model(s) four times (at 0000, 0600, 1200, 1800). For each Run time there are many Forecasts with one hour step. Select the starting Run time for the starting day and the ending Run time for the ending day.
- Select Starting/Snding Forecast time and a step to iterate thru the forecast time range selected.
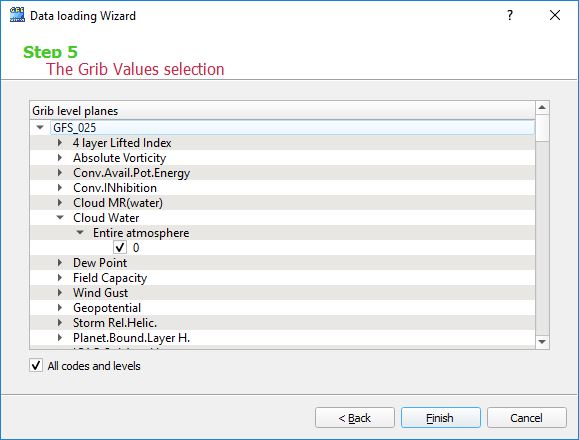
- If only several physical values are needed, select them in the Grib level data tree view. But to get rid of the selection just check All codes and levels check box, and the program will get all of the values.
- Click the Finish button and all the forecast times will be downloaded.
- The last numerical model Run is roughly corresponded to the current system time in UTC minus 3.5 hours for GFS (and 4.5 for WAVE).
The program features:
- Download instant files from the NCEP hosts (NOMADS).
- On download, select data by the complete set of parameters, as defined by the GRIB2 filter tool.
- Load weather forecast data at the program startup from the local grib files.
- Load shape-file maps (contours) and overlay them on a sequence weather maps just loaded.
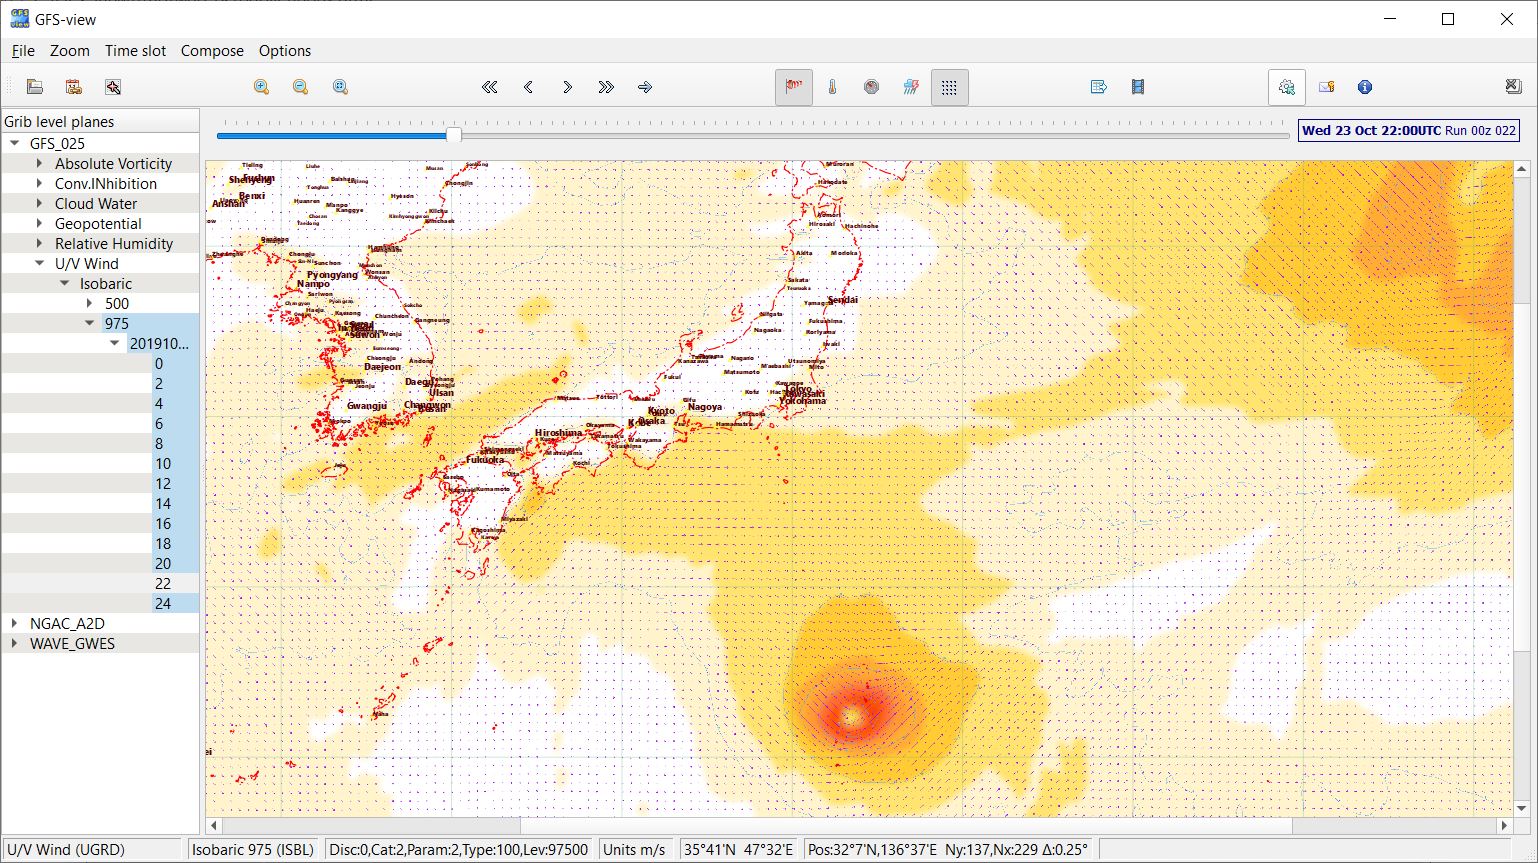
- For a particular date-time slot and forecast time, generate and display a weather forecast map for a particular grib code, level and height.
- Select a region of interest by specifying a city as a region center and region size, or typing a center point longitude-latitude and region size, or interactively from the Open Street Map view.
- Define visual appearance of the map by selecting ramp color table, font face and size, line color etc.
- Save opened file names and all other settings into the program INI file that will be used next time
- Navigate and automatically open grib code-level planes for a date-time-forecast slot selected
- Zoom and scroll the weather map and vector overlays to any resolution to see more details
The program is used for:
- Quick and easy access to instant weather forecast data of the NCEP center.
- Download many data sets at once: by several days, many numerical model run times and many forecast times, by a variable time step and any combinations of grib code-level-heights tags.
- Filter data on the server to save bandwidth, downloading time and disk space, extensive set of parameters of the NCEP GRIB2 filter tool is implemented.
- Wise grib file loading: a grib file is treated as a sequence of the code-level-height planes, loaded separately, so they have difffferent attributes like ramp color tables, and the grib data planes are only loaded when necessary.
- Straightforward GIS approach to vector overlays, standard ESRI Shape is used for geography attributes of the surface, orography and so on.
- All the Natural Earth shape files are usefull.
- Each shape-file has its own visual parameters like line and text color, line style, etc.
- All the data are projected into the geographic projection (x,y are decimal degrees), the working region is selected by a city to bind, raw latitude-longitude coordinate, or modern interactive approach by the OSM tiled view.
Open local files
To open local data (grib2 and shape files) click the Open File button.

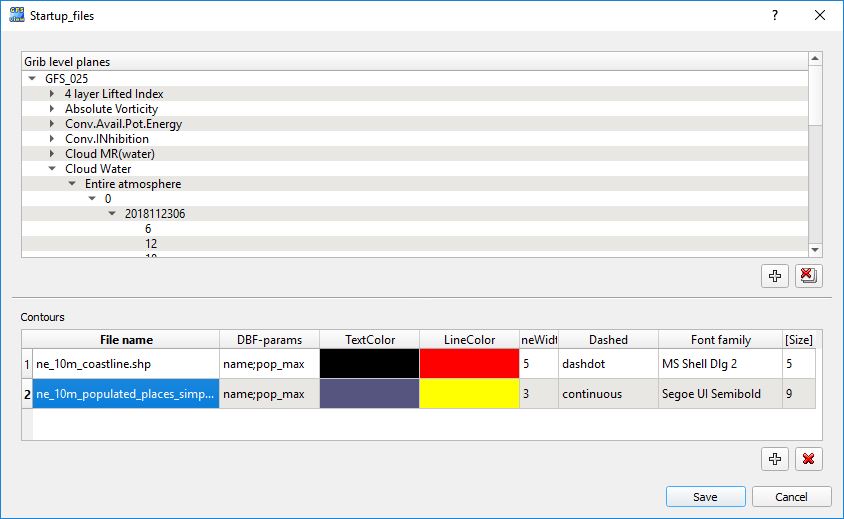
It brings the Startup files dialog window.
- The upper part of the window is used to load gridded data, the lower is to load vector shapes data.
- To load GRIB2 files click the Plus button at the bottom of the Grib layers list.
- Navigate to a subfolder with GFS grib files and select the files to load.
- To load shape files with contours (coastline and populated places) click the Plus button at the bottom of the Contours list.
- Select shape files from the fixed folder Import/ Shp.
- Download the other Natural Earth shape files, place them to the Import/ Shp folder and open them as usual.
- Select visual attributes of contour files. Most attributes are obvious, but the DBF-params attribute is a little special.
- The DBF-params string defines the name of DBF field used for reading and ranging the place labels. For example, if the populated places names are stored in the field with the name NAME and the population values are stored in the field with the name POP_MAX, the DBF-params string should be as name;pop_max.
- The title Startup means that you should not do the file selection again. Click the Save button and the configuration just made will be saved into the INI file and used in the next program startup.
Grib2 download manager
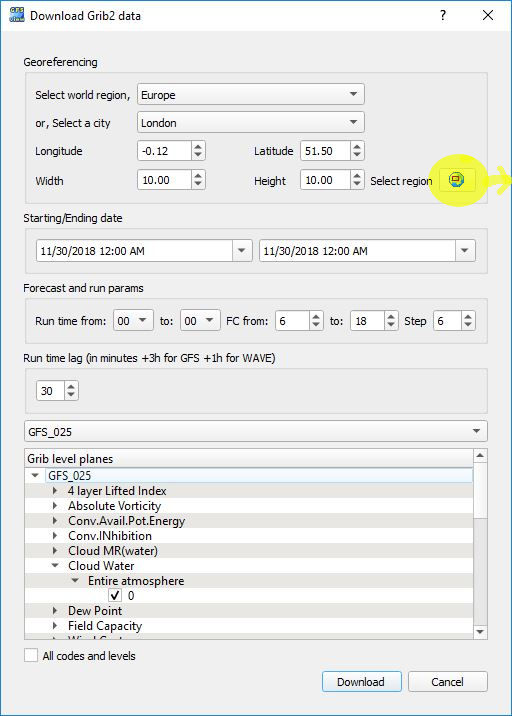
To load grib2 files from the NOMADS servers click the Download button.

It brings the Download Grib2 data dialog window.
- Define a region by selecting a City from the list and adjusting region Extent (the width and height with the latitude and longitude in decimal degrees).
-
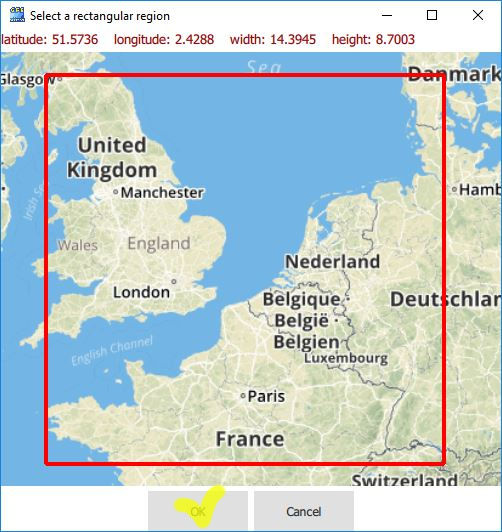
Or, use Open Street Map widget to interactively select a region with the mouse dragging.
Click the OSM button to bring the OSM map widget
 .
Don't forget to click the OSM widget OK button to return region coordinates back to the Download window.
.
Don't forget to click the OSM widget OK button to return region coordinates back to the Download window.
- Define a date and time by selecting the Starting and Ending date. Each day in the range will be processed, starting from the first Run time and ending by the last Run time.
- Define the Run and Forecast time by selecting Starting Run time for the starting day and Ending Run time for the ending day. All the forecast times from the first to the last, with the Step selected will be downloaded
- Define Grib2 data planes to download. There are many Grib2 data planes (or messages) with the different physical values evaluated at the diverse height levels of several level types. So, the triplet Tag,Level type,Level height is used to uniquely identify a grib2 data plane.
- Click the Download button and wait until all the files will be downloaded and opened.
Settings manager


To manage the program settings click the Settings button. 
The Settings dialog window consists of the two panels, the Interface settings and the Grib palettes list.
- Use the Char set list box to select char set for shape file labels. For example, to get Cyrillic population place names, select Windows-1251 from the list.
- Use Network Proxy group of fields to set your proxy connection. In that case, at least the two fields Host and Port should be filled.
- Turn the animation Play timeout field to speed up or to slow down the time slots animation.
- Use the Units group of list boxes to set up a physical values units (SI, Imperial or any in between).
- Select the Jpeg files check box in the Video export group to get separate jpegs instead of a video file.
Export functions and extras
- To get Wave model WaveWatch3 forecast select the WAVE_GWES role tag when downloading.
- To get NEMS GFS Aerosol Component model forecast select the NGAC_A2D role tag when downloading.
-
To Save the data sequence as a video file click the Video button
 .
Video file will be saved into the Documents/ GFS-view/ export/ Video folder in the mp4 format.
.
Video file will be saved into the Documents/ GFS-view/ export/ Video folder in the mp4 format.
- To save multiple images instead of a video file, go to the Settings dialog and choose the Video export/ Jpeg check box.
-
To Export the data sequence as a CSV (blank separated) text file click the Export button.
 Text file will be saved into the Documents/ GFS-view/ export/ CSV folder.
Contact Me
Send me your feedback, comments, and suggestions, please.
Email to: BadPr0ogrammer@gmail.com
Copyright ©2017-2019 BadProgrammer. All rights reserved.